| click on the pics for larger view | |||||||||||||
 Ā |
This is where it began (at my house anyway). We drug it from under a sycamore tree onto a trailer with a come-a-long and towed it home… this first shot was directly off the trailer and into my yard… Boy…was my wife excited !!! |
||||||||||||
 |
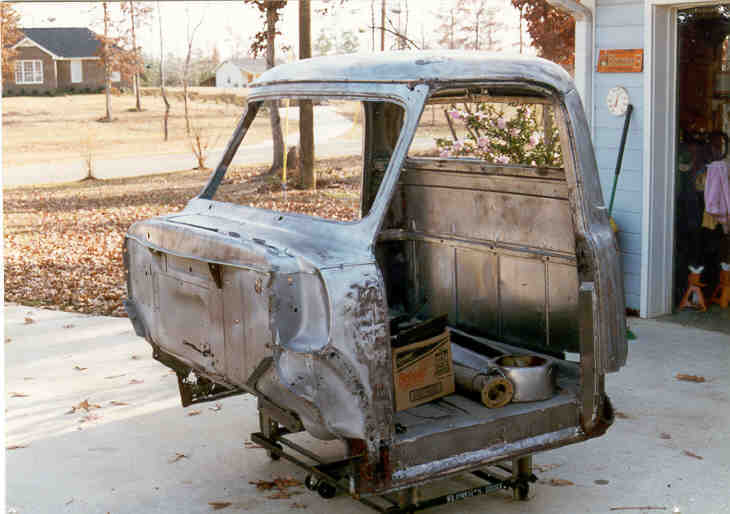
Started stripping her down…this is the cab after it was lifted off the frame. You can just see the rust through in the lower cowls and the door bottoms.. | ||||||||||||
 |
Here's the frame and bed… the bed was scrapped… there wasn't that much left to repair and it had been severely 'used' for several decades…the frame was in good shape with some minor pitting between the cab and bad… boxing plates will reinforce that later. You can see by the background changes in the pictures.. this hasn't been a quick project… |
||||||||||||
 |
This was the 'good' door.. The bottom 6-8" were cut away inside and out. Patch panels from Mid-50 F-100 replaced the bad metal…We were lucky that the hinge pockets were sound | ||||||||||||
 |
Here's the cab after the soda blast.. all four corners were cut out as you can see and the panels inside the doors that attach to the floorboards will be partially replaced as well…with the exception of the really bad hammer work on the left cowl, bullet hole in the right cowl and a ding in the left rear cab corner… the cab was in good sound condition. The fuel filler hole will be filled by the patch panel and the fuel tank moved to the frame rails in the rear. | ||||||||||||
 |
Here's a shot of the rear of the cab, minus it's corners…this was just after a good scrubbing with vinegar and a final vinegar rinse to remove all the soda… it was in every tiny crevice and crack.. and was a bear to remove… but it left a nice smooth finish on the metal, It is a water blast media which leaves the metal coated to prevent rust (for a while) with no heat distortion in the panels. The truck stayed in a 'coated' no prime condition for about 3 weeks. No, granted it wasn't out in the weather, but in an unheated garage/shop… no signs of rust when we started cleaning for the primer… | ||||||||||||
 |
These are pics of the rear end… it came from a '75 Lincoln Mark IV… and is equipped with disc brakes. To accommodate the 295-50-15s we had to shorten it 5.5" and we still will tub the bed about 2" on each side… The ladder bars are made from 3/4" XX pipe (three grades heavier than Schedule 40) and we used 3/4" Heim joints and grade 8 bolts. | ||||||||||||
 |
AVO coil over shocks were chosen and all the custom brackets, mounts and work was done by my good friend Dave Phillips, master fabricator and drag car builder. | ||||||||||||
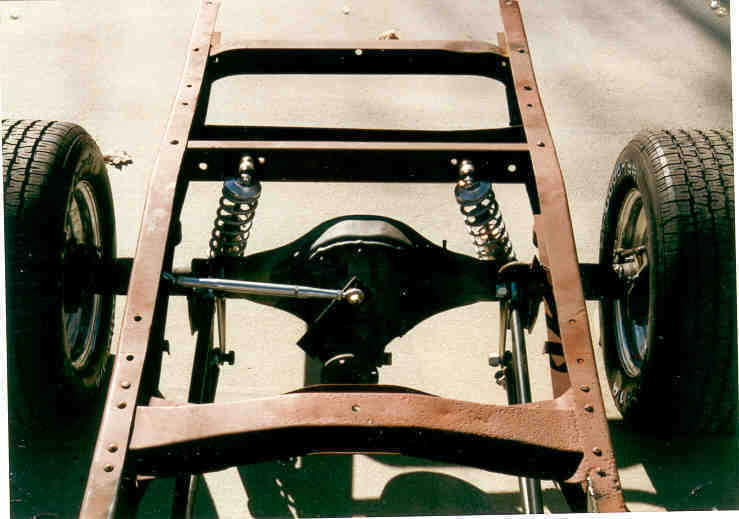 |
Here's the view of it all put together. The original 2.75 conventional gear will be replaced with a 3.00 posi unit. | ||||||||||||
 |
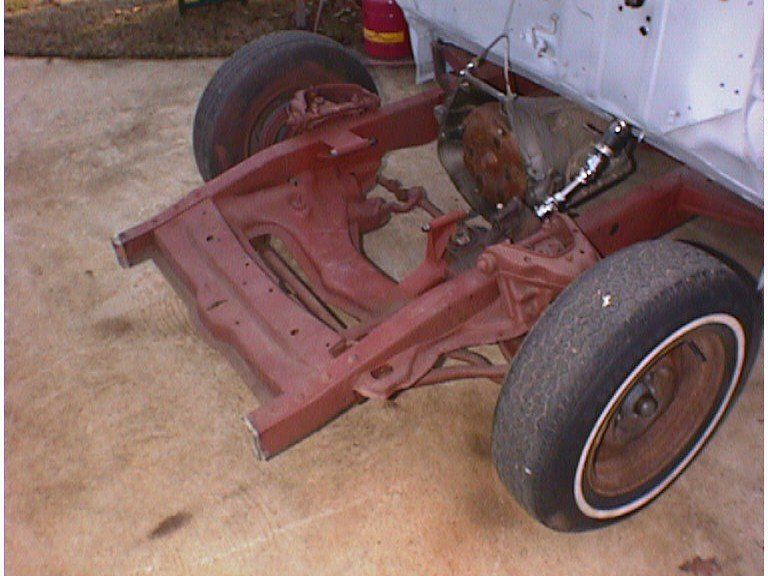
We grafted in a Volare front clip and used the power steering pump and power brake booster from the same car. The steering is connected to a 86' Caddy Tilt/Slide column (see article on the FTE page) and you sit comfortable in a mid 80 GMC truck bench seat (another article on the FTE page) | ||||||||||||
 |
This is the finished product, in primer.. there is another article on the FTE page with all the details | ||||||||||||
 |
This picture shows the finished passenger door… ( the darker gray is overspray of a different shade primer) You can see how nicely they turned out | ||||||||||||
 |
This is the floor before… it's hard
to see in the picture, but the whole area on the right side of the truck is like a sieve.
We torched them out from the firewall back to the raised seat support for replacement. No… that's not me cutting… but my hairline is the same… this is my buddy Donnie Lepper.. the magic man with the patch panels and the filler…. He did the doors and cab corners.. |
||||||||||||
 |
this is the finished floor …. Less the transmission hole…..see below for the hole Ā | ||||||||||||
 |
I cut the hole a little big on each side… but it won't be rubbing anywhere… the tunnel cover will be fabbed/rolled later…or I'll buy a nice stamped unit I saw at Pigeon Forge this year... Mid-Fifty's F-100 had it. | ||||||||||||
 |
I've done some preliminary fitting on the bed and rear fenders… but have taken them all off to start doing plumbing on the frame | ||||||||||||
 |
This shows the fender cut outs for the 295-50 x 15 tires on 10" Prime wheels..Ā we still had to tub the bed two inches on each side.Wheel tubs will be nice molded ones I bought from Dan Carpenter at Pigeon Forge this year | ||||||||||||
|
The tilt front end is installed and working properly... still have to add the lower sections of the fenders and do the dress up glass work.Ā The latch will be from a Caddy trunk latch probably.Ā Controls for the tilting will be a Hotronics control unit with limit switches at the up/down limits | ||||||||||||
|
|||||||||||||


