DRIVE LINE PHASING AND UNIVERSAL JOINT ANGLES |
BY JOHN NIOLON
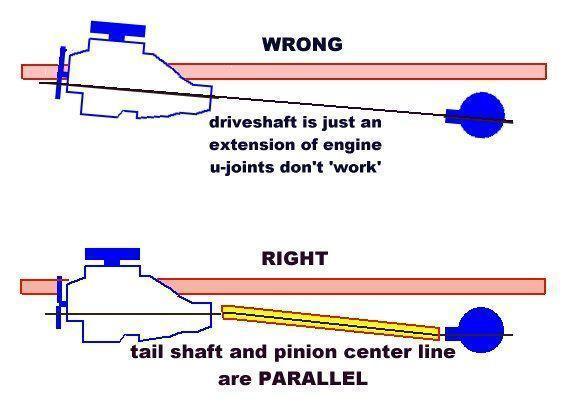
| Engine, drive line or rear suspension changes sometimes move things around. Engines must be offset to clear steering boxes, different rear ends have different driveshaft centerlines. Everything in the drive train must operate in "phase" in order to minimize vibration, noise and component wear. Think about a complete automotive drive train from the side -this includes engine, transmission, driveshaft and rear axle assembly. Part of the "phasing" procedure includes making sure that the center lines of the transmission and the rear axle drive shaft are parallel. If the axis of the pinion gear is parallel with the ground, then tail shaft of the transmission must also be parallel to the ground. It can be higher or lower but it MUST be parallel.
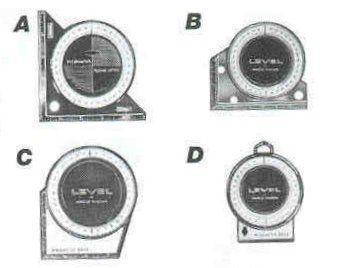
Trying to determine this while laying upside down under a car with a bunch of two-by-fours, baling wire and an leaky old hydraulic jack supporting eight hundred pounds of engine and transmission can be taxing (and a little unnerving). It's not really all that hard and while it does go easier with some dexterity it requires a minimum of math skills. All you need is a device like these pictured below . Some call them a protractor Some call them angle indicators. Sears calls them a universal protractor and they are about $10.00. Harbor Freight sells them for less than that. There are a lot of protractor tools around but these are the easiest to use.
Whichever you use (especially the cheaper one), I'd check it against a known accurate level. Set up a 4' or longer level or a good Starrett #98 millwrights level and shim to get it level, set the protractor on top of it and check the bubble or dial for accuracy when the reference level "is", the protractor dial should read zero.. it wouldn't hurt to check it on both planes. Now, that is out of the way I would begin like this... First I would park the truck on as level a surface as possible, both front to back and side to side.. It's best that the vehicle be 'loaded' or carrying its normal operating weight if possible. Sometimes when your building your vehicle this isn't possible, the engine isn't installed yet or the bed and bed wood haven't been installed. If this is the case, I'd recommend checking these measurements again after the vehicle is complete. They shouldn't be far off, but if you are using extreme u-joint angles (normally in jacked up 4 wheel drive trucks), it could make the difference in a work or no work situation. So, suck in your gut, slide under the car ( a creeper certainly helps here ) and hold the protractor base flush against the nose of the pinion gear shaft or rotate the pinion yoke until it is vertical and lay the protractor base against it. You can now read the position of the pinion gear axis relative to the ground. Let's say it was below the horizontal 90ࠦnbsp; mark and sitting on 81 That means the pinion gear axis is tilted slightly upward at the nose. Now attach the protractor to the tail shaft of the transmission or on the oil pan if it is flat and parallel with the tail shaft. Follow the same procedure of getting the bubble level and take a reading. Lets say it is 90 degrees.. the engine is left in this position and the rear axle assembly is not moved, the drive line will be out of phase since 90 degrees plus 81 degrees = 171 degrees....It's 9 degrees out. The center lines are not parallel.
To be in phase, the tail shaft and the pinion gear must be parallel.
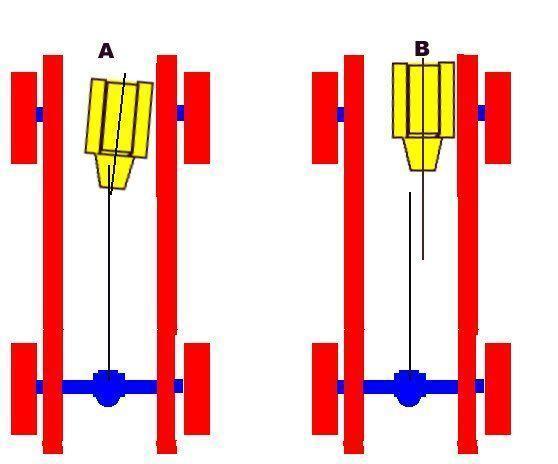
To be parallel the center line of the transmission and center line of the pinion gear must be on the same plane..the angles must total 180 degrees.Now that you have your angles calculated and know how much you have to move 'something', you can decide whether to tilt your engine/transmission down a little or rotate the axle up slightly so the axis of the pinion gear is on a more level line. Of course, this will mean moving engine mounts or spring perches or adding shims if your engine and rear end are already mounted. If you're still fabbing up the drive train.. it's much easier, add or subtract shims, braces or tighten or loosen your baling wire till you get it where you want it. Very probably the height of the tail shaft will be different that the height of the pinion flange (because the engine sits higher in the frame than the rear end) that's o.k. as long as the horizontal axis of the tail shaft and pinion = 180 degrees added together. PARALLEL. When that PARALLEL thing occurs you are finished . . . on that plane ! Now you have to work on the other plane. Ddealing with an engine offset. Most times when you do an engine swap, the engine will be offset to the passenger side by some amount. . . the amount depending on the size of the replacement engine. Most people don't realize that many factory engines are also offset. Another thing people don't realize is that the pinion center line in hardly ever on the center line of the frame. They, also are offset to the passenger side. Look at the Vertical View (from above)
Drawing A represents the wrong way to offset an engine. Done this way you are sure to have driveshaft vibration, noise and U-joint wear. Drawing B shows the correct method of offsetting the engine. It doesn't matter that the two U-joints are not on the same centerline from the front of the frame to the back (my engine is set right 2" and the pinion is 1-1/2" right.) It only matters that their individual centerlines are parallel..
The Horizontal view:
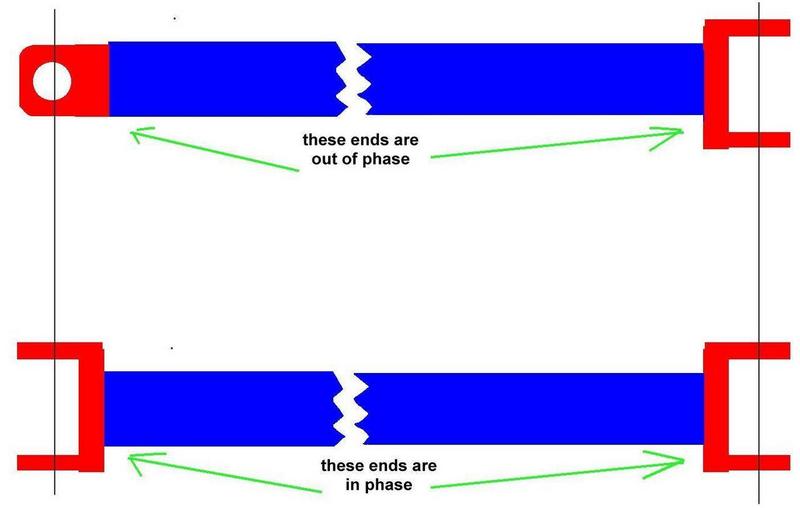
Look at the centerline of the pinion and the centerline of the crank/transmission - they're parallel. You don't want the arrangement in the upper example (except in old torque tube setups) Again you want the U-joints to "work". The U-joint angle I was referring to is just this. If you hold the U-joint parallel to the ground, it has a range that it will travel in both the vertical and horizontal plane. You want "some" angle in the joint so the bearing will "work" and not just be an extension of the driveshaft with all the load on the same needles all the time. But, as the U-joint reaches its limit of travel in either plane - you're working it too hard and it will wear abnormally. Normally the pinion gear angle is a negative angle and the nose of the rear end is pointed down. This allows for the upward movement of the rear end when torque is applied. Those who follow racing will know the term spring wrap. Setting up a drive line for racing situations or high torque off-roading is different and much more complicated than for street vehicles, as many more variables enter into the formula. For normal street operated cars and trucks the normal drive shaft angle is from one to three degrees from horizontal. One degree being the minimum to allow the u-joint to work and the bearing surfaces to rotate in the housing preventing all the load to remain on one group of needle bearings all the time. And, ideally the operating angles on each end should be within one degree of each other. There are tables that define the maximum allowable operating angles and they are determined primarily by driveshaft rpm. The range is 11.5 degrees at 1500 rpms down to 3.25 degrees at 5000 rpms. By no means should you operate toward the extreme range of angles. This will only lead to premature failure of u-joints and components and possibly considerable damage to other components and the vehicle in general if the failure happens at high speeds. All of this so far is assuming that you are using single joint (or single Cardan) u-joints. Because of the nature of these type joints, they do not turn at a constant velocity if they are not at a zero operating angle. They actually turn in an elliptical path rather than a true circle, so at two points in the revolution they are turning faster than at the opposite two points. Later developed CV (constant velocity) joints have helped rectify this action and smooth out the operation of u-joints considerably. The position of the u-joint yokes on each end of the driveshaft can help smooth out this to some degree. The yokes should be positioned so that their center lines are on the same plane. If you're using a factory shaft, all this has been taken care of. If you're building one or having one shortened or lengthened, the yokes should be positioned so that their center lines are on the same axis. The action of the opposite yokes tends to cancel out the speed variations of each other.
I would also recommend getting a reputable shop to build and balance a new shaft. Unless your dealing with very high torque racing shafts or funky little short shafts on 4 wheel drive trucks with radical lift kits and transfer cases and stuff ...the cost of a new driveshaft will probably be less than $200.00. Cheap when you consider that long road trip with the vibration and droning a poorly made or out of balance shaft can generate, or the cost of damage a poorly made unit could do. Not to mention the embarrassment Normally all you need to give them is the yoke center to yoke center lengths and your transmission type and rear end type both with spline counts or flange types. I was fortunate to use the engine, transmission and rear end from one car and only had to shorten my driveshaft to fit the new installation in a truck frame. Some manufacturers use a double tube shaft with rubber grommet type vibration dampeners inside the outer tube holding the inner shaft to it. If you have this type shaft and want to maintain that function be sure and tell your driveshaft man and he can build your new shaft using those ends. There are several good street rod building books that cover this information and a number of good sources on the internet that have excellent technical information. Some of these guys have 20+ years of experience in driveshaft work and their writings and drawings are probably easier to understand that my ramblings. Much of my information originally came from one in particular. I used it as a tutorial for my work. It is called "Practical Engine Swapping, by John Thawley. It's handled by Steve Smith Auto Sports, P.O. Box 11631 Santa Ana Ca 92711 714-639-7681 and its $10.95 & 3.00 shipping. You can probably find it at a good bookstore. Got mine at Barnes and Noble. I strongly suggest that you talk to a competent builder. Ask around for references. I hope my notes here will make your drive line phasing a little clearer...the pictures are a lot easier than the words in explaining this. Good luck on the project. Copyright 2001 John Niolon, All International Rights Reserved. This document may not be copied or published without prior written consent of the author. jniolon@att.net |


