MOUNTING UP
ENGINES AND TRANSMISSIONS
by John Niolon
Chances are pretty good that if you've
bought an old truck and you're investing some money in it, your feet/work/money will
follow one of two paths. Restoration and making it just like new or Rodding' making
some cosmetic or structural or even radical changes to the vehicle to produce your desired
truck. If you're doing a complete restoration you need to look no further'. the
drive line that Henry installed is just fine with you, thank you very much and you
ain't gonna change it, right ?? So your interest should leave here and head
toward the cloth covered wire vendor web sites' But, if you're going to keep the
appearance of Henry's old truck but want something a little stronger under the hood well,
you can stay around with us for a while.
The majority of the time
when you're building a street truck you're going to make some upgrades in both safety and
performance and let's just face it, Comfort. It doesn't mean you're a girly man if
you want soft upholstery and power steering. In my case it means I'm old and enjoy
enjoying what I drive. I struggled with bad synchronizers and double clutching. “Armstrong”
power steering and no air conditioning for years in old trucks because I had to, well, I
don't have to now. My old arthritic hands appreciate steering you can turn with two
fingers ! So, make your own justifications and let's move along.
What I've gathered here
is not a step by step for engine mounting... it couldn't be, every engine is different and
offers different opportunities. It's just a collections of things I've read,
experienced, and seen while doing some engine swapping or helping others with
theirs. The old time rodder will probably laugh at all this, but a first timer
(which I was not long ago) might get something useful from it. If one sentence keeps
someone from getting hurt or burning something off to start over, then it's worth it to
me.
Day dreaming...er...plan of execution
One of the first things
we think about changing is the drive line' engine, transmission and rear end.
Sometimes we say “it's for the economy” but if we're truthful it's all about
having your butt slide back in the seat when you open it up. So, we start
daydreaming as the cubic inch numbers climb in our head. If you sit down with a
pencil and a sheet of paper and start listing engines you like, transmissions that will
work with them and rear end ratios and how they effect engine cruising rpms you quickly
surmise that the combinations are almost endless. And we didn't even factor in
overdrive add ons ! It takes a little mental agility and some research to come up
with the best combination. And, that combination is what WE want. It
doesn't mean that it's the perfect solution, it's just what we want.
Now, you've crossed off
all the losers from your list till the winning design is left on the page. If your
final goal is a nice cruiser with some extra energy under the hood (which is what most of
us want) I'll be willing to bet it reads something like this 300-400 cu inches
with auto trans and gears between 2.75 and 3.5:1. With some exceptions I'll bet
that is the mid point in the range of all the street trucks driving around today.
And, it's a good combination.
What Henry built mostly
had an inline 6 or a flathead or Y-block in it so there's a better than average chance
that your SBF isn't gonna fit the engine mounts. What do you do now ??? Maybe this will be
of some help in deciding.
Decisions
Before you start
mounting up the engine/trans you should have already decided what your front suspension is
going to be because it will seriously affect where your engine will sit or at the very
least, how it will mount up between the frame rails.
While there are infinite
options here. You can retain your stock axle/springs. In updated options there are Volare
sub frame, Mustang II IFS cross members, Crown Victoria clips, and even Jaguar IFS, the
most common ones in our era of trucks are the Volare sub frame graft and the Mustang II
cross member IFS offered by several vendors.
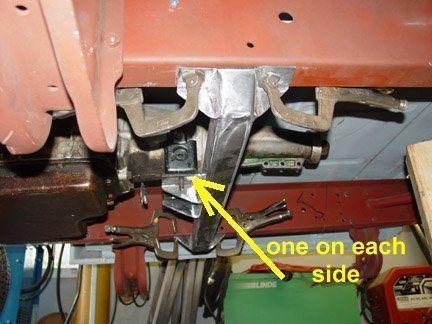
One thing I won't get
into here is front/rear mounts. Some engines use mounts that actually attach to the
front end and rear end of the block. While some of the information here will apply, my
references here deal with side mount engines where the motor mounts bolt directly to the
sides of the engine block and there are usually only two'one on each side.
Each of these suspension
options have a somewhat unique set of 'opportunities' to be creative in your engine mount
choices. Let me add something here before I start... if you are a good fabricator,
all of this information is probably just a reading exercise. You know by looking what will
work and if you don't like the markets offering, you'll just probably fab up your own
mounts. But, even if you are a seasoned builder sometimes it's cheaper to buy than to
build when you have time constraints or you're lazy.
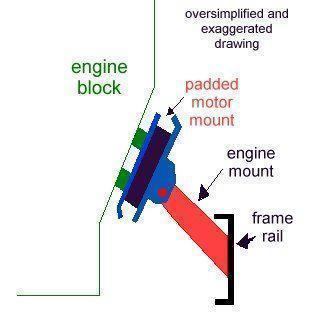
Definition of mounts
There is a distinction
that should be made here between the terms motor mount and engine mount. They might
not be industry standards but this is how I'll use them here. The engine mount is
the part that attaches to the frame in some way and holds the engine in place thru the
motor mount. The motor mount is the actual part that bolts to the engine
block. Normally it's two pieces of steel plate with a thick rubber or urethane pad
sandwiched between them. This pad isolates the engine vibration from the
frame. You see this type of motor mount on all production cars and most street
rods. Serious rodders and racers use a solid mount which has no isolation pad.
High horsepower applications tend to destroy padded mounts when the engine torques.
Stock suspension
If you're staying with
stock suspension you have two basic choices... engine mounts that are attached to the
frame rail or cross members that are attached to the frame rail and have attached engine
mounts. The mounting will be pretty straight forward, steering boxes are not in the
way so offsets aren't a problem and there is plenty of room for headers.
Several
vendors offer engine mounts for popular engine swaps' small block Fords and Chevys
are pretty much covered' the individual mounts are pretty generic with a engine plate that
fits the block in question and a length of tubing that will have to be trimmed to fit your
frame' or some offer the engine mount plate with rubber cushions and a plate that mounts
to the frame rail.
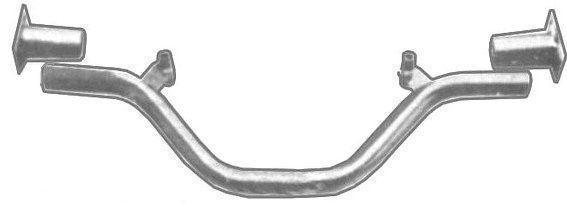
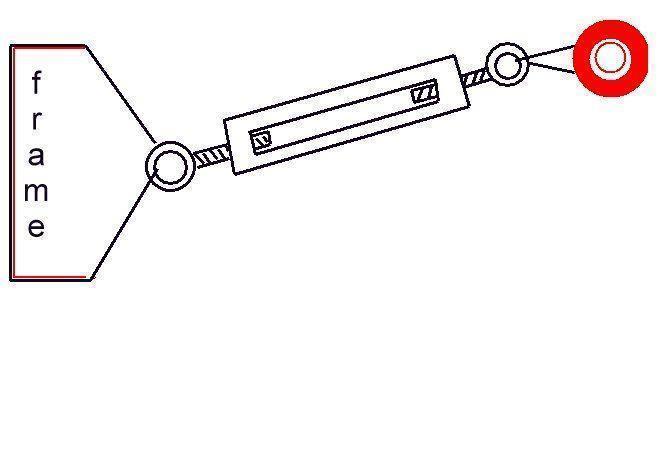
The cross
member type is a bent tube that runs from rail to rail under the engine with the mounts
welded to it' the tube fits into a shorter tube at each rail with a mounting plate you
have some adjustability for engine offset and engine tilt by sliding the tube back and
forth before welding it in place. While all
these versions are grouped by year classes (i.e.53-56) they are by no means perfect fits
in fact, the term 'universal' really means
that they universally don't fit anything exactly.
If you have removed the stock suspension and have
replaced it with a Mustang II setup from Heidts or TC I or Fatman's or whoever you
approach engine mounts a little differently. Most
of the IFS aftermarket vendors recommend that you box your frames back to the firewall.
This beefs up the front of the frame and now gives you another point of attachment for your engine mounts the
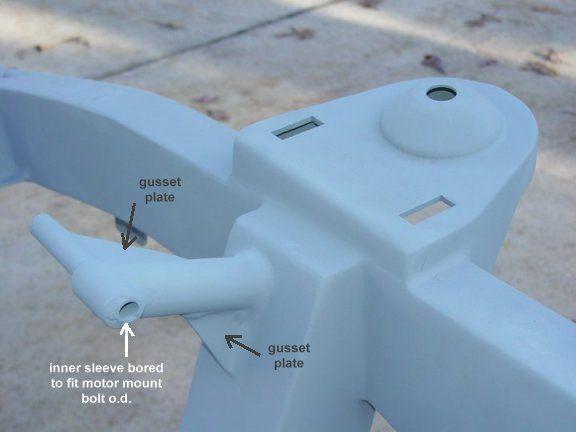
boxing plate face. Another point has been added and that is the cross member itself. On my 460 the engine mounts are welded directly to
the IFS cross member. They are basically a
piece of 1.5” schedule 40 pipe with a gusset plate (brace) on the side and underneath,
and a cross tube with an inner tube thats i.d. that is reamed a few thousands larger than
the o.d. of the mounting bolts
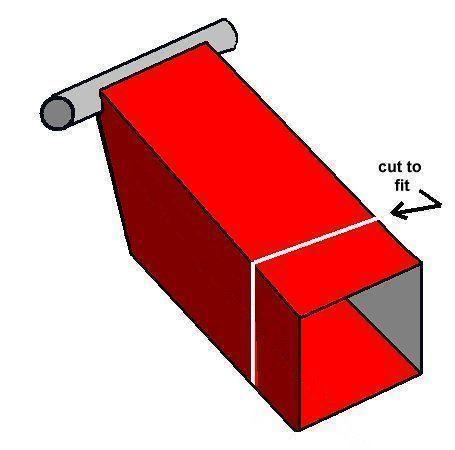
The 'cut to
fit' variety will work for this install you just cut them shorter than with a frame rail
mount. There are several types to choose from
the basic one is a piece of square tubing with a smaller tube at the end where the actual
motor mount bolt slides thru or one a little
more sophisticated with the rubber mount inserted between the frame and the engine mount
itself. These are only two crude
representations. There are several variations. There are also bolt on (no welding required) engine
mounts available in the same general configurations.
There are several things you need to have in place before you start adding/fabbing up
your engine mounts. You're going to set your
engine on three planes (or three and a half) front to back in the engine compartment, left
to right and up and down. (the half is a
matter of engine tilt which we'll talk about later)
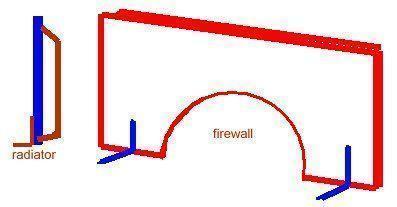
Both the Radiator (or at least the radiator support)
and the Firewall must be in place before the engine can be set in it's permanent location. Spacing between these two fixed objects is
critical. For the radiator you have to have
clearance for either a mechanical fan or electrical fans if you use them. For the firewall, well thats obvious... you don't
want your engine banging on the firewall when it torques.
AND, don't forget the fan shroud if you're using one.
If it's not practical to set the actual cab and
radiator, you can make dummy pieces from plywood or masonite with angle or shelf brackets
that can be clamped to the rail. A little
measuring will give you proper locations and you can trace a pattern on cardboard for a
template for your cut get the transmission tunnel cut as close as possible.
If you do mount up the radiator,.I'd also put a thin
piece of plywood or sheet metal over the inside of the radiator for protection. The engine swings around some during positioning
and a water pump fan snout can destroy a radiator before you can say “Aw, Crap !”
If you're down to the bare frame in your rebuilding,
either temporarily place the radiator in place and
set the cab or mock up something to mark their location.
This will set your limits front to back for engine placement.
Side to Side
Have the steering box in place (especially in Volare
cases) and consider anything that will protrude from the engine on the sides LIKE HEADERS !!!
Lots of times you'll have interference with upper control mount hats when using big
headers and that Volare steering box is as big as a pigs head and will interfere with most
anything. Also keep in mind where steering
linkage will be routed to the steering box. I've
seen cases where headers had to be custom built to route around steering linkage.
Up and Down
The normal rodder parameter for engine mounting is ”as
low as possible” just short of dragging the
oil pan on the ground. With stock suspension,
the interference is minimal for setting the engine pretty much anywhere you want it but
with IFSs the cross members and sub frames can
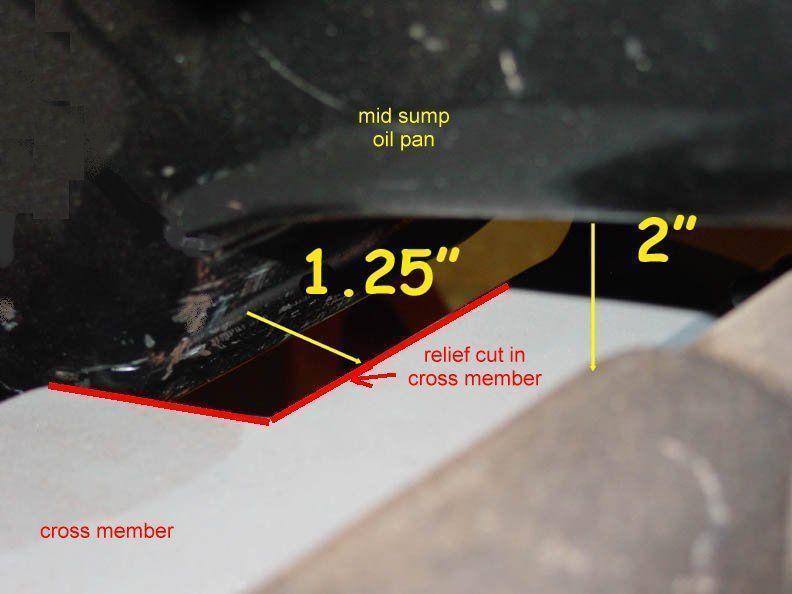
present obstacles. Most Mustang II cross
members require the use of a rear sump (or at least mid-sump) oil pan to get the engine
down in the engine compartment properly. Also,
the lower you set the engine the further back into the transmission tunnel it will set
giving you more room up front for fans, shrouds and such.
Third
and a half
The third and a half plane is the tilt. In most normal situations not super low rides or
jacked up mega trucks the intake manifold carb mounting plate should be level. The intake manifold will have some angle built in
which should put your engine drive line 1-3 inches lower in the back than in the front. That
is fine. But it is also important when setting up your driveline and pinion angle. A certain angle isn't as important as knowing what
that angle is and using it in calculating pinion angle.
More later.
Filling
the hole
So either your staring at a hole between fenders or
bare frame rails. Your suspension choices are
made and completed. The position of the
radiator and firewall are known and marked or parts in place so it's time to fill the
hole.
An engine hoist is just about mandatory here unless you
have an overhead crane or jib hoist in the garage, a chain hoist hung from a joist or
large oak tree limb or an extremely patient and strong friend. The problem with chain
hoist hung from joists or trees is that they aren't very movable and positioning can be
tricky. A tilting mechanism on the hoist helps a lot, but isn't absolutely necessary. I
think it's best to use engine and transmission bolted together for alignment but you can
do it with just a block. I think you should
also have at least the oil pan, the heads, water pump (and fan if mechanical) and exhaust
system mounted on the block (headers or stock manifolds).
The starter wouldn't hurt either basically anything that is going to stick out from
the block and cause interference with something else.
The internals, crank, pistons, head parts and such aren't as necessary since
they only add weight and don't figure into the placement of the block. Intake manifold should be used..especially if it's
a huge tunnel ram since the upper interference with the hood might need to be considered
as well as leveling the carb. (although this can be done on a bare block also, if you know
the offset of the intake manifold.
Now gather up some stuff to hold your engine in place
once you get it in place short sections of 2x4, wooden wedges, tie wire, a floor jack and
a couple of jack stands, bricks, concrete blocks and a cup of coffee.
A word here on using concrete blocks. Your frame
will have to be high enough above the ground for you or a helper to slide under it and
guide the engine/transmission in place and to tie it off when it's where you want
it. Your frame (or whole truck) should be well supported and very stable.
Concrete blocks don't make the best supports. I've seen blocks sitting on the ground
that appear to be solid but when you pick them up they fall apart. They will break apart
and crumble without notice. There are accidents every year from people working
under concrete block supported cars and trucks. Do a google search or ask your local
EMS guys and they'll tell you the same thing. Buy good jack stands and sit them on
something secure... if not on a concrete slab, use a plywood base under them to keep them
stable. It never hurts to keep a jack under the load with the slightest pressure for
support in case something unexpected does happen. Which leads me to the next
subject...safety.
Be Safe
I can't stress safety enough. It's much more important
than getting the engine set in a hurry. Your
Momma's old saying is true ” it's all fun and games till someone loses an eye”, or a
finger, or a life. Take a minute before every
lift or movement and think about what can happen if something changes suddenly. If a chain breaks or something shifts and your hand
or arm is in a pinch point. A brand new cast
on your arm will be neat for all your buds to sign, but it's gonna slow your progress on
the truck. What's a pinch point you ask ?? It's
any place between two heavy pieces where serious damage can be done to your body points
should those two pieces find their way together say for instance between the exhaust
manifold and the frame rail should your hoist cable break or your hoist cylinder blow out. Think before you put your hand/arm/finger/ear in
any place where it could be pinched. No... even better, think of a way to do it WITHOUT
putting your extremity in a pinch point.
In construction work there is a practice that uses what
is called a pre-lift checklist. Basically it's
a list of everything that needs to be done prior to lifting anything with a crane or
hoist. It covers the rigging, the ground
conditions, the capacity of the lifting equipment... even wind and weather conditions for
the surrounding area. It's a step by step procedure from the first cable attachment to the
final setting of equipment. It considers the number of people involved and circumstances
to that particular lift. It's done to keep the job and the people safe and unharmed and
prevent damage to equipment, buildings and surroundings.
It's a good procedure and has prevented many accidents. It isn't too complicated for you to do the same
thing, at least in your head before you raise that engine block and roll it around on the
engine hoist. Basically it's a “remember to
think about this” list to follow.
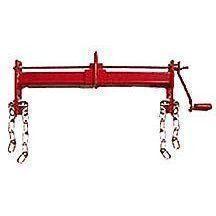
The hoist will not come with anything but a hook Spend
a little money and buy some good quality chain or cable. Cable
slings are ok but not adjustable for length. Chain
is a better choice, and Grandpa's rusty chain he used to snatch the tractor out of the
creek twenty years ago isn't it. Anything that is joined by a 1/4" bolt and two
fender washers ain't it either. Spend a
little money! You're going to be supporting something that weighs from 400-800 lbs several
feet in the air. If it falls no matter what
stops it, there will be damage. Do it right.
One other consideration when working inside a shop,
depending on your rigging, your trucks elevation, your garage ceiling height, the
extension of the hoist boom and probably the moon phase, you might not have the height to
install the engine. Look at all this before
you start. If you're mounting up the engine in a vehicle with radiator in place or with a
full front clip installed you're going to have to lift the engine/trans up and over that. The hoist boom will probably be extended to it's
limit and might be 6-8 feet long. When you
start jacking it up it uses up vertical space rather quickly. I checked my hoist and made
some measurements. For every inch that the
jack raises, the end of the boom (with the hook) rises approximately 3-4 inches so one
foot of jack equals 3-4 feet of boom height. Not
a problem if your ceiling joists are in the 15' range.
The shorter you can rig your engine (hoist to block distance) the less it
has to go up. Also consider movement once it's
hanging up there... overhead light fixtures, garage door hardware.. etc can be in the way. Plan ahead. Also
the legs of the hoist should be extended at least under the engine for balance and may be
4-5' wide at the front wheels. All that hoist leg/wheel structure has to go under the
truck. If you're using jack stands for
support, make sure the hoist will clear them as it rolls under the truck. A trial fit without the 600-700 lbs of block
overhead might be in order.
Hang your engine on the hoist using your new shiny
cables or chain. Use head bolts or exhaust manifold bolts or a carb mounting plate if you
have the intake in place. Just make sure it's
safe and secure. If it doesn't feel right.. re-rig it.
A note here. The more balanced and stable the engine/trans is when hanging from the
hook, the better. It's enough of a job to
guide the engine into the hole when it's rigged properly, it's doubly hard when you have
to wrestle it around to keep it straight or level side to side... spend a few minutes with
your rigging and the job will be easier all around. Getting
hurt or losing body parts here is not an option. A
little down angle to the rear helps get the engine/trans started into the hole and the
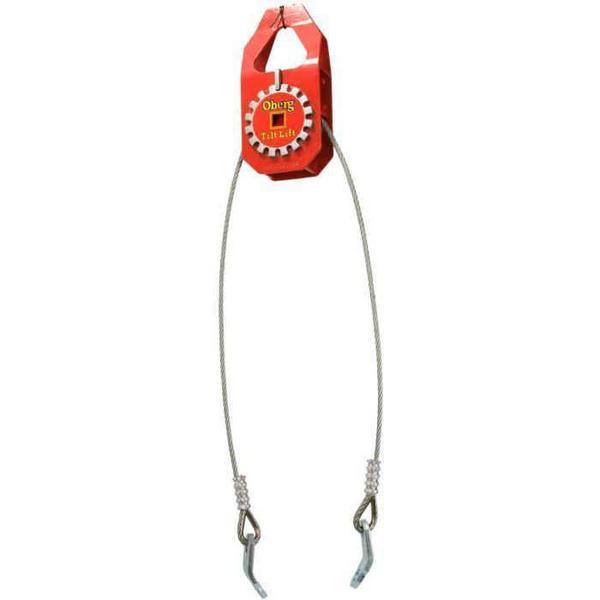
transmission back under the tunnel. This is
where the tilting mechanism is great. There
are a couple of options... the cable type that adjusts tilt in 1/2" or so increments
and the screw type that has infinite adjustments. Either
will work well.
Raise your engine on the hoist a couple of feet off the
ground and look at it. Are the bolts you used
adequate size or are they bending/stretching from the load ?
Is the load balanced and stable ? Can
you turn your load leveler (angle adjuster) easily or is it binding ? You want smooth action here. If something is binding, something ain't right. I'm assuming you're doing your rigging and lifting
right in front of the frame. If not and you
have to roll the lift some distance, keep the lift low to the ground to keep the center of
gravity low and stable. When you're in front
of the vehicle and if everything is ok then raise your engine/trans enough to clear the
front obstruction air dam, radiator, etc. Watch
your overhead clearances. Ease the engine
hoist forward so the engine enters the engine compartment.
If your an engine mounting virgin (like we all were) it can be a
little bit daunting to have a 400-800 pound hunk of iron hanging 6 feet in the air over
your head and have to push it around on a hoist. Make all your moves slowly and
smoothly. If a wheel hits something and stops DON'T try to wrestle it over the
obstruction... back up the hoist and move the blockage. This is no time to prove
your strength and manhood. Just have confidence in your rigging and remember your safety
and you'll be able to do it... also don't get under it.
Down it Goes
Lower the engine/trans into the hole using your
adjusters to adjust angle and the hoist to wiggle it around,
a friend helps a lot here watching for interferences and blockages and to lean on
it when needed. If you're working with a bare frame, the frame can sit on it's wheels or
jack stands if you're wheel-less. The engine is just gonna drop right into place. If you're working on partially assembled truck, The
hoist will have to guide it down thru the engine compartment and under the cab. The truck needs to be high enough so someone (the
helper, hopefully) can slide under the truck and guide it.
Make SURE the truck is supported well. There
is usually a little jostling and wiggling of parts. Make
sure the blocking is secure. As you guide it
in the rear end of the trans will have to be lifted as the assembly slides into place. It will eventually be pretty level and centered in
the hole. That's a good starting point and do
not unhook the chains or supports to the hoist.. It's going to be moved around some in the
next little while.
So now, the
engine/trans is still hanging from the hoist and roughly positioned in the engine hole. It's going to be heavy at the tail and hopefully
your helper has positioned a jack stand or concrete-wooden block assembly under the
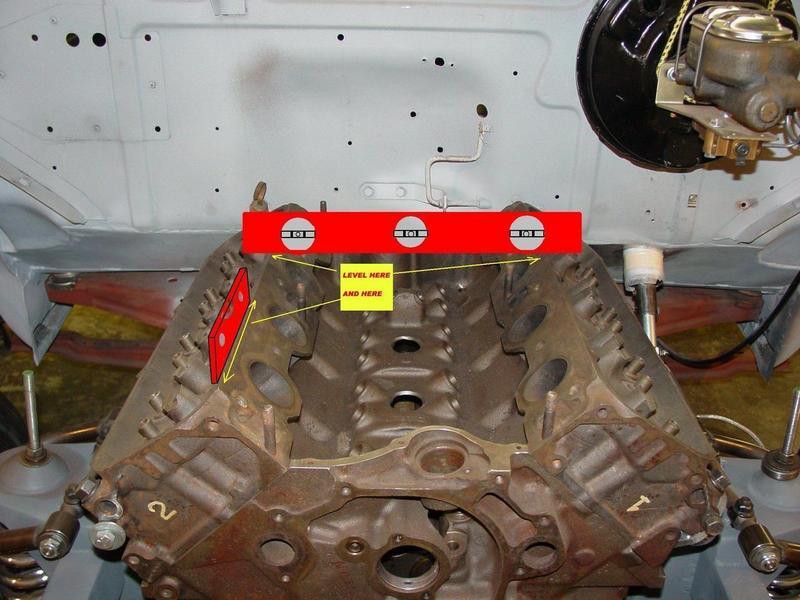
transmission tail piece. Set a level across
the engine on points at the same height ( across the heads on valve cover edges and along
valve cover ridges front to rear. Level the
engine where the bubble is at least inside the lines.
Check your measurements side to side in the engine hole and get the block roughly
centered in the opening between the frame rails.
Now, it's
time to take a break, have a cup of coffee, a Coke and a Little Debbie cake, a frosty
beverage or a smoke. Catch your breath (didn't know you'd be out of breath did you) and
look things over. Look for interferences we
discussed earlier. Look for potential future
problems with linkages and exhaust routing. See
if you have sufficient clearances where you need them.
If you see problems or clearance issues you'll have to
calculate what your offset needs to be. Steering
boxes, headers and linkage all can give you grief on the driver's side as well as
suspension parts on the passengers side. Sometimes
raising or lowering a half an inch can be the cure. Other
times it's just easier to move it to the right a little.
Offsetting the engine isn't a big deal... most
production cars have the engine offset to the passenger side at least a little unless it's
a huge amount, it won't even be noticeable lots of Volare users have a 2” to 2-1/2”
offset. The important thing is that the engine
centerline front to rear is parallel with the frame rails,
there is another article on driveline phasing that explains it very well.
drive
line phasing article
The first place you need to get proper clearance is the
oil pan to cross member. Normally in street rods (or street trucks) you put the engine as low and far back as possible,
but not so much as to cause interference with the pan/cross member. The engine bolted in doesn't move much up and down
but it will torque to the passenger side when the throttle is opened. it's limited by the
motor mounts but sometimes they break leave yourself a little room here... 1/2" to 1”
is plenty. I used 2” on mine.
Keep after your leveling and centering (and/or
offsetting) until you have the engine exactly where you need it to be... don't forget to
keep the center line parallel to the frame rails. Measure
at the center of the crank shaft to the frame rail and the center of the transmission
output shaft to the same frame rail and make sure they match
Now, are you happy with the clearances to all body and
frame parts ?? Are your headers in the clear ?? can you actually see a way to connect your
steering linkage ? Well then it's time to make
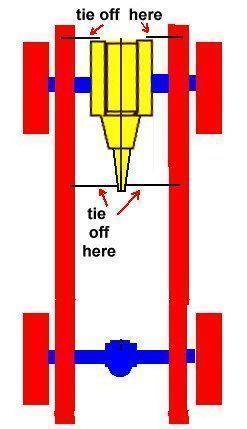
it as unmovable as possible so you can fab up (or install) your engine/motor mounts. Using wooden wedges, 2/4 scraps, whatever you need
to use to make it stable and stay in place. Put a block or spacer between the oil pan and
cross member to keep your height correct. There
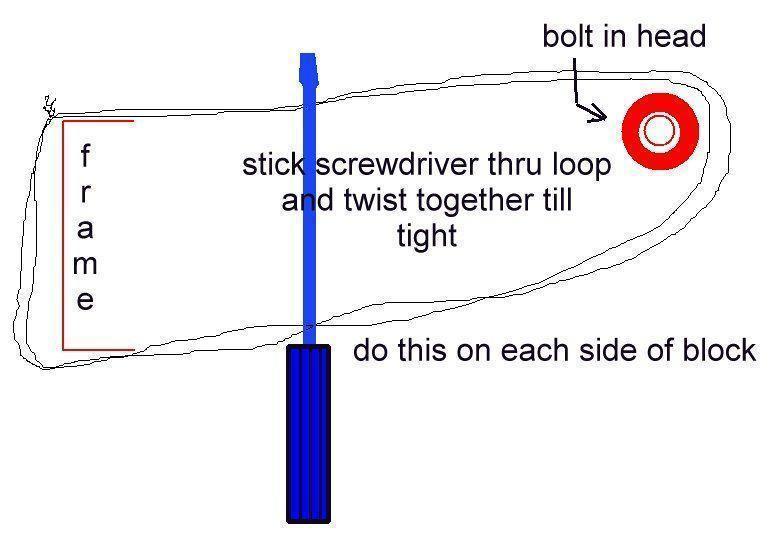
are several places that you can use to tie it off to keep it still. The front of the head offers lots of bolt holes to
add a bolt with a large washer and tie wire to the frame.
I've used soft tie wire like they use to tie rebar together because it's
soft, reasonably strong and easy to work. But any wire of sufficient size and strength
will work. I wrapped a double loop around the
frame rail to a bolt screwed into the front face of the head. Do this on both sides then using a screwdriver or
rod, twist the loop to tighten it. Have your engine pretty close to where it should be and
snug down your loops pretty tight before you start twisting, you'll get some wire
stretchand have the slack to take up so it will take several turns before you see any
change. Watch your measurements and be sure
you tighten both sides the right amount to keep the engine on your chosen center line and
level. If you really want accuracy, use much
heavier wire (less stretch) for a short loop around the frame and the engine bolt then use
a long bodied turnbuckle connected to the loop on each side and you have infinite
adjustability.
Do the same thing on the tail end loop your tie wire
around the frame and then loop it around the tail piece of the transmission, one from each
side and tighten each side till your center line is correct.
After some amount of work and sliding in and out from
under the frame you will possibly have the engine square, plumb and at the right
elevation. Time for you second well deserved
break and maybe take some pictures for your build album.
Those of us that are a little anal will take reference measurements and record them in case something moves or a ceiling joist breaks and hits your tie
wires and the engine falls over. Well, I said
we were anal. While you're wolfing down your
second or third Little Debbie start looking at where your engine mounts will have to
connect to the frame/boxing plate, etc. I'd go
ahead and screw the motor mounts onto the block to help determine angles and distances. If
you're using premade engine mounts, it might be as simple as one measurement and a cut to
shorten the mount and tack it in place. If
you're fabricating from scratch it will be a little more involved.
Take that last swig of coffee and start by locating
some stiff cardboard and scissors. (If you
have the pointy kind, don't run with them in your hand)
Start on either side (but I'd start with the easiest one first, yes, one will be easier than the other) and start
making your pattern for your home made engine mount. Masking
tape, measuring tape, marker and scissors will have you patterned out in just a little
while. Then it's a simple matter of
transferring the patterns to the steel you plan to use, creating the pieces and fitting
them up. If you're confident enough to make
your own mounts then the fabrication skills needed will be there and the tools to make it
happen... welder, grinders, plasma cutters, torch, etc.
This isn't really a complicated task, it's just time consuming and tedious
sometimes, but it's worth it. Take your time
and do it correctly. If you've never
done it but think you want to try do some research. Look
on the web and in hot rod magazines and books for examples.
Find one you like and copy it. If you
still have doubts, run your ideas by someone who is knowledgeable and has done this
before. This is where custom car builders get
creative, they'll add little artistic stuff to the mounts' drill holes and such' but
simple works just as well..
A word on workmanship here. Everyone is a welder (actually the machine is a
welder, the operator is a weldOr) some are good weldors and some are daubers like me. Anything that I need to be 100% perfect' I get my
friend/mentor Dave to weld. I can weld up
things to fix them and make yard art but anything structural needs good skills, and good
penetration. An engine mount is one of those
things. If you don't trust your welding skills
100%, get a real weldor to do your work. Another note... You can pay him outright or
barter time/services with him, but make it worth his time. Chances are he doesn't need the
practice and could probably be making money with the time he's giving you.
A note here for Volare sub frame users. While there are kits on the market for Volare
engine mounts, they are pretty much a collection of pieces that you have to jigsaw puzzle
together to make the mount on the drivers side. Hint! save your money and use plain old
steel stock and cut it to match your pattern, it's quicker and much less frustrating. This
mount will have to be fabbed from scratch 95% of the time due to the big ole steering box
sitting right where your engine mount needs to connect to the sub frame. It will take a little ingenuity, grinding and
cursing to make it right, but it can be done. Just
be forewarned that it can be a patience trying task.
While you're fabbing up your engine mounts you also
need to be thinking about your transmission mounts. They
will probably be easier to build but you have other things to consider as you make your
plan... routing of exhaust pipes, placement of mufflers, existing cross members,
additional equipment to mount (transmission cooler for example) and connectivity. This mount will have to be removable if you ever
need to remove the transmission (for instance, after you shred the internals with that
hi-torque monster you build in front of it.)
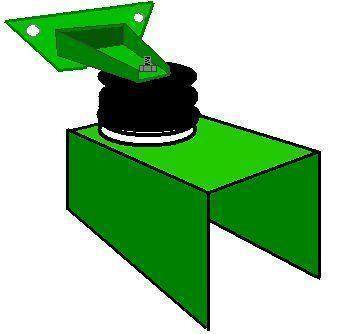
The first thing I'd do here is buy the mounting pad
that is made for that transmission. This could
be one or two pieces but it's basically a vibration pad and a means to mount it to the
cross member and transmission. Here's a fair
picture of one for a C-6 transmission.
Different transmissions have different mounting
systems. Some look remarkably like the engine
cross members ! So build/buy yours
accordingly. There are several aftermarket
mounts available. Examples are in the catalogs
and online, or you can just build one yourself. Here's
a link to what I did for mine.
transmission
cross member build article
You could also fab up something like this with a removable
center section. Using muffler tubing and
flanges you build a cross member with a removable mid section for transmission work. It's not expensive and gives you ample support for
your transmission.
Back to the engine mounts.......
I'd take all my pieces and tack weld (or bolt) them
into place. Check your measurements again and
make sure your plumb, square and level and nothing has shifted. Before the engine is secure do the same with the
transmission mount. If you're content with all
the measurements do your final welding if not break the tacks loose and rework the
placement.
So, you've gotten your engine in and where it needs to be,
you've adjusted' or fabbed up your engine mounts and transmission cross member and mount,
you've disconnected the hoist, removed the blocks and tie wire and nothing has hit the
floor. Way to go !! You're getting close to the end of this project.
Now the piece that makes it go needs to be included. The drive shaft.
There is a slim chance that you'll get the old stock one to work with a new
engine/transmission combo and possibly a new rear end.
This is one area where you need to let a professional help you some. There are some things you need to check and adjust
if possible before you give your truck over to the driveshaft man. Go back to the article mentioned above on drive
shaft phasing and pinion angles. This is
important if you want a smooth vibration free feel while cruising down the road with your
arm on the window. The article tells you in
plain talk (I hope) what to do and how to do it.
drive
line phasing article
Some folks feel confident enough to build up a drive shaft. I'm not one of them.
Depending on your transmission choices and the rear end type you might have a yoke
(u-joint) on one end or both ends or maybe a mating flange on one or both ends. Whatever
your engine/trans choices are, you'll probably have two different end pieces to come up
with. The drive shaft tube will almost always need to be shortened and balanced. The easiest safest path here is to locate a good
spring shop. Most cities with at least a couple of traffic lights have a shop that does
spring and suspension work for truckers. They
are set up to build your drive shaft. Check
the yellow pages or google your area for “building drive shafts”. Some companies even offer a worksheet for measuring
your shaft needs.
The Deal is Done
So that is pretty much it.
Bolt it all up nice and tight and put away your tools. I'm pretty sure you'll run into something that I
haven't covered in this article... something totally unique to your situation. Those are the things that you can consider the
wonderful little bonuses you receive for working so tirelessly on these old trucks. Enjoy them and remember all the details, it makes
for good parking lot talking with your buds... “I remember
when I was building engines mounts for the truck, the funniest thing I ever saw happened..”
Disclaimer paragraph
All International Rights
Reserved. This document may not be copied or published without prior written consent of
the author.
This information was
done by me and for sharing amoung FTE users. I only ask that if you reproduce it give me
credit for it and if you make money from it ??? then give me my percentage. Since I have
no way of knowing your level of competence, wiring, welding or cutting skills or
mechanical ability?.there are no guaranties or warranties either verbal, written or
implied with this article. Pictures were made at different stages of construction and all
parts in pictures may not be complete in each shot, but I've tried to make the plans or
drawings complete to the best of my ability. If you have questions or see mistakes or
problems, let me know by e-mail and I'll make the corrections if possible..Use these ideas
at your own risk. Modify them at your discretion and to suit your purpose. Your mileage
may vary. batteries not included. much assembly required. Wait one hour after building to
enter the water, additional charges may apply. not all applicants will qualify for
advertised A.P.R.. for ages 10 to adult. Side effects are comparable to placebos. Do
not take drugs when building or operating machinery ...just say no ! and pull up
your jeans... just say no to crack !!!
John Niolon
3700 Virginia Drive
Hueytown, Ala. 35023
jniolon@att.net